Thursday, December 15, 2011

Trimester 2 - Metals Project / Bookmarks

Metals Project / Bookmark

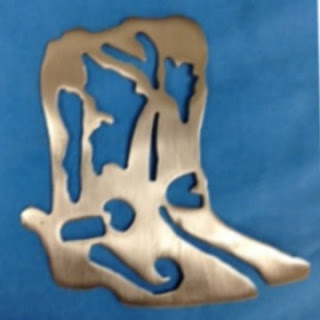
The first project of the 2nd trimester for the 8th grade students was a Metals Project.  Students pierced, cut, filed and sanded negative spaces in their metal to created the desired design. The idea for this project was for the students to determine how they could use negative and positive space to help create details for their Metals Bookmark project.

Student began the project by creating 6 different 3 X 3 ideas using the photo manipulation program, Corel Photo-Paint.  They then had to decide where negative shapes would be in order to create detail within their specific design.  Next each student was given 8 jeweler's saw blades and a saw frame to begin their project.


Finally, the students used files to 'clean up' any over-cuts and rough spots that were created from their sawing.  Students were also instructed to sand their project when the filing was completed.

Here are a couple examples of the 8th grade work this year:

Cowgirl Boots - Bookmark

Cowboy - Bookmark

Trimester 1 - Printmaking, "The Christmas Angles Program"

Mr. Benham's Class Contributes to "The Christmas Angels Program"

The purpose of the program is to help supplement the St. Vincent De Paul Adopt-A-Family program. The Christmas Angels Program is designed to give less fortunate parents an opportunity to select two new Christmas gifts for each of their children. This program is especially designed to give parents a sense of dignity and pride in making the Christmas season more joyous and fulfilling for their family. 

Families are invited to our Outreach Center in the West End on a Saturday in December. While the parents select two gifts for their children, volunteers help the children make an arts  and crafts gift for their parents and receive a bag of candy from Santa. Parents take the gifts home to give to their children on Christmas morning.

Students from Mr. Beham's 8th grade art class created handmade name tags for each of the children's presents this year. Mr. Benham heard about the program and asked his students how they thought they could help. The students were more than excited to create tags for the presents, so Mr. Benham decided to change his typical printmaking project into a project where others could benefit. Mr. Benham said, "The students really enjoyed this project. The best part was that they started to talk about what was really important and started some great dialog in the classroom about giving back to those in need. I was really happy to be a part of this program this year, but I hope that we can do more next year."


The Students used their printmaking skills to create a variety of tags to be used for the children's presents. Each student created 30 tags in different colors, designs and even languages for the program.

You can become a Christmas Angel by donating new toys or a monetary gift to purchase toys for children who would otherwise be forgotten during the holidays. For more information, please contact Maura Carpinello at (513) 562-8841 x 211. The Society of St. Vincent de Paul in Cincinnati is a non-profit organization providing a unique style of personal assistance with food, clothing, medicine, rent, utilities, transportation and companionship to people facing economic, emotional or spiritual crises.

Trimester 1 - Watercolor

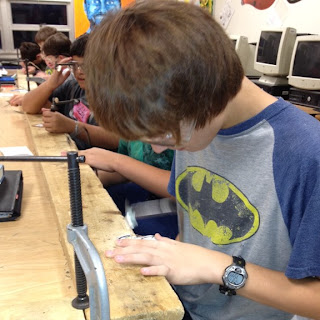
Watercolor Painting (Relief Project)

Students chose a background, middle ground, foreground and a subject for their project.  Their source was created using the Photo manipulation program, Corel Photo-Paint.

Students traced the different layers on watercolor paper and then decided which techniques they would use for each layer.

Once their painting was completed the students used foam board to 'pop' each layer out so that they were on a variety of levels.

Below are 2 examples of student work:


Trimester 1 - Wire Sculpture

Students started the 1st trimester by talking about contour line drawings.  We worked on shadows and silhouettes for our drawings.  The students were also introduced to blind contour drawings to help their eyes, brain and hands work together while drawing. 
Once the students had a grasp on the concept of contour line drawings, they began to come up with a few plans for a wire sculpture.
Below are a few examples of their work:

"Flying Pig"

"Ballet Dancer"

"Elephant"

Welcome - 2011-2012 School Year

Welcome to Mr. B's Art Class Blog Page.  

I (Mr. B) have been teaching art for the past 15 years.  My K - 12 Art Education certification is from Miami University (Oxford, Ohio) and I have a Masters in Education from Marygrove College.   Currently I am an 8th grade art teacher in the Mason City School District.  Mason City Schools are located 20 miles north of Cincinnati, Ohio.  My School currently has approximately 1800 7th & 8th grade students and I am one of 2 art teachers responsible for the 8th grade art program.


Current 8th grade art projects have included:

Book Binding
2D Drawing Projects
Computer Graphics
Batiks
Wire Sculpture
Metals

Relief Watercolor Painting

Ceramic African Masks

Glass Fusing

Tuesday, May 24, 2011

Glass Fusing

The students are always excited to work with the glass for this project.  Not sure if it is because they are introduced to cutting glass, bending glass with fire and working with the kiln, but it is a great opportunity for the students to recognize that buildings, skylines and landscapes can be used as a subject for art. 

The students are introduced to the different types of glass and discuss what will happen to the glass when it is fired at a specific tempature.  Using stringers, frit, liquid frit, sheets of glass, grinders, cutters and fire the students created fore, middle, and background to help give their project a similiar look to the actual skyline or landscape chosen.


Once the project was completed they were loaded into the kiln and fired with a tack fuse program.

Wednesday, May 11, 2011

District Art Show

Last weekend the Mason City School District had their DAS (District Art Show) and all the buildings and grades were represented.  There was a variety of art work displayed from the students and the 8th grade shared their glass, metals, water color, sculptures and paintings. 


The 8th grade also displayed their giant thumbprint portraits with the following notes attached:

 "After working in the style of Chuck Close for a couple weeks, Mr. Benham's 4th bell students wanted to see if they could create a large painting of a person similar to how Chuck Close had created several portraits.
With further research regarding his styles, the students found that Chuck Close had created some portraits using his thumbprints.  the students decided to create a portrait with the same technique.  With approximately 340 thumbs from the 7 classes, the students chose a familiar subject - Mr. Benham"


"Mr. Benham's 3rd trimester 8th grade students created this portrait using values of purple with only their thumbprints.  The background was created by several MI students, and as you step back and squint your eyes a little you can see the image of our "Super Segrist".

Mr. Segrist was chosen as the subject of this painting because the students wanted to show their support for Mr. Segrist and give him strength as he battles pancreatic Cancer.

Just another reminder for all that , 'NO ONE FIGHTS ALONE!'"

Saturday, April 16, 2011

GIANT MR. BENHAM

After working in the style of Chuck Close for a couple weeks, my 4th bell students wanted to see if we could create a large picture of a person similar to how Chuck Close had. With further research regarding his work, the students found that Chuck Close had created some portraits using his thumb prints,.  The students decided to create a portrait using only thumb prints and with approximately 170 students from the the 7 classes we found an easy subject.

The Subject:

Mr. Benham - Photo taken by 4th bell student

Subject drawn on 5 ft. canvas 

Applying thumb prints 

Student working on thumbprint portrait

Subject and painting

Subject with values and no eyes

One eye was added and different values were added

Eyes were finally added - passing students were no longer scared of portrait


Even though the portrait isn't completed, every student from the 7 classes have placed their thumb print somewhere on the portrait.  Other thumb prints have been added by other teachers and any student that enters the class and asks, "Wow, what is that ?... Hey, it looks like you Mr. Benham!"

The students want to try and complete another large portrait before the end of the school year.

Tuesday, March 15, 2011

Chuck Close #2

The students have been working hard on their Chuck Close inspired pictures and they are looking great.  In class we not only watched the short video on Chuck Close, but we discussed color, value, tints and shades.  Each student choose 2 colors that they wanted to use for their picture and then created a variety of tints and shades to use as a 'reference key' for their picture. 

Unlike Chuck Close, the students were only going to use these 2 colors to create the values for their picture. I also decided that it would be alright for the students to create a grid on both the source picture and their paper.  I believe that the grid help the students to draw their picture more accurately and therefore have a more successful  project.  This also will help raise young artists' self-esteem when it comes to drawing and artistic ability.


IRON MAN
(light & dark values drawn with grid)


IRON MAN
(light & dark values added according to Value Key)


Other Student Work:
(inspired by Chuck Close)


Sunday, March 6, 2011

Chuck Close


The first project of the 3rd trimester is one of my favorite projects. The students will be introduced to the American artist Chuck Close. Chuck Close is a photographer and painter that has gained world wide recognition for his amazing massive-scaled portraits. Even though he was left severely paralyzed from a spinal artery collapse in 1988, he has continued to create beautiful and stunning paintings.


Metals

The last project of the 2nd trimester for the 8th grade students was a Metals Project.  Students pierced, cut, filed and sanded negative spaces in their metal to created the desired design.

Student began the project by creating 9 different 2 X 3 ideas.  They then had to decide where negative shapes would be in order to create detail within their specific design.  Next each student was given 12 jeweler's saw blades and a saw frame to begin their project.

Finally, the students used files to 'clean up' any over-cuts and rough spots that were created from their sawing.  Students were also instructed to sand their project when the filing was completed.

Here are a couple examples of the 8th grade work this year:

Track Shoe Bookmark:


Saxophone Earings:

Monday, February 14, 2011

Batik


A Batik or Batiking is an ancient art form that has been handed down for thousands of years from generation to generation. Batiks can be found in the Middle East, Africa, Indonesia, Malaysia, China, Thailand, Philippines, India and more!

This month the students have been working on creating their own Batik.  A Batik is the method of dying fabric and then applying wax to those areas so that the fabric will remain that dyed color.  Once the fabric has visited a variety of dye baths, and waxed after each, the wax will be removed to uncover the design.  


The students were to choose a book that they have either read in their Language Arts Class or one that they are currently reading.  Students were then instructed to illustrate a scene from that book and add the title for their batik design.


The students have enjoyed the Batik project and are excited uncover the wax and see the art that they have created.

Students applying HOT wax to their fabric

A student removing his fabric from the dye bath

Batiks drying in the drying rack


 Here are a few of the finished Projects - 8th Grade Batiks


Thursday, January 27, 2011

African Masks

The latest project in Mr. Benham's Art Class had the students researching tribes from the Congo region of Africa.  Each student had to choose one or two different tribes and design their own masks combining characteristics from the original tribal masks and their own imagination. Colors and shapes weren't the only qualities that had to be taken into consideration when creating their own mask.  The students had to also keep in mind what their mask was created for.

Once the students had completed their masks, they were glazed and fired.

The final component of this project was for the students to stand in front of the class and present their mask to their peers.  The students were required to creatively write a 3-5 paragraph paper describing the following:
  • What tribes were used as inspiration?
  • What characteristics were 'borrowed' for their mask?
  • What is their new original mask going to be used for?
  • Who is required to wear the mask?
Below are a few examples of the masks that were presented this week: